Difference between revisions of "Child Process - PSM"
From VersaVision Support
| (2 intermediate revisions by the same user not shown) | |||
| Line 15: | Line 15: | ||
<BR> | <BR> | ||
<gallery widths=800px heights=229px> | <gallery widths=800px heights=229px> | ||
File:Child-Process-1.png | File:Child-Process-1.png|link=Child Process - PSM | ||
</gallery> | </gallery> | ||
---- | ---- | ||
<div style=" | <div class="logo_img" > | ||
{|style="background:transparent; color:black" border="0" height="230" align="right" valign="bottom" cellpadding=10px cellspacing=10px | |||
|+style="background:transparent| | |||
[[PSM| | |-align="right" | ||
| | |||
|[[File:PSM-Button-With.png|200px|Return to PSM Main Page|link=PSM]] | |||
|} | |||
</div> | </div> | ||
---- | ---- | ||
| Line 29: | Line 32: | ||
<BR> | <BR> | ||
<gallery widths=800px heights=229px> | <gallery widths=800px heights=229px> | ||
File:Child-Process-3.png | File:Child-Process-3.png|link=Child Process - PSM | ||
</gallery> | </gallery> | ||
---- | ---- | ||
| Line 36: | Line 39: | ||
<BR> | <BR> | ||
<gallery widths=800px heights=229px> | <gallery widths=800px heights=229px> | ||
File:Child-Process-4.png | File:Child-Process-4.png|link=Child Process - PSM | ||
</gallery> | </gallery> | ||
---- | ---- | ||
| Line 43: | Line 46: | ||
<BR> | <BR> | ||
<gallery widths=800px heights=229px> | <gallery widths=800px heights=229px> | ||
File:Child-Process-5.png | File:Child-Process-5.png|link=Child Process - PSM | ||
</gallery> | </gallery> | ||
---- | ---- | ||
| Line 50: | Line 53: | ||
<BR> | <BR> | ||
<gallery widths=800px heights=229px> | <gallery widths=800px heights=229px> | ||
File:Child-Process-6.png | File:Child-Process-6.png|link=Child Process - PSM | ||
</gallery> | </gallery> | ||
---- | ---- | ||
| Line 57: | Line 60: | ||
::[[Actions|<u>'''Click Here'''</u>]] for information on setting up an Action. | ::[[Actions|<u>'''Click Here'''</u>]] for information on setting up an Action. | ||
<gallery widths=800px heights=78px> | <gallery widths=800px heights=78px> | ||
File:Child-Process-7.png | File:Child-Process-7.png|link=Child Process - PSM | ||
</gallery> | </gallery> | ||
---- | ---- | ||
<div style=" | <div class="logo_img" > | ||
{|style="background:transparent; color:black" border="0" height="230" align="right" valign="bottom" cellpadding=10px cellspacing=10px | |||
|+style="background:transparent| | |||
[[PSM| | |-align="right" | ||
| | |||
|[[File:PSM-Button-With.png|200px|Return to PSM Main Page|link=PSM]] | |||
|} | |||
</div> | </div> | ||
---- | ---- | ||
Latest revision as of 11:31, 11 August 2023
A Child Process can ONLY be a sub-category of a Process. This type of Monitoring Point allows the user to capture a Start & End Time within a Process.
An example of this being used would be a Job (Root Process) with a Production & Setup (Child Processes) sub-category. Data would show the Total Job Time, Total Production Time, and Total Setup Time.
This page will provide information on the options available on a Child Process.
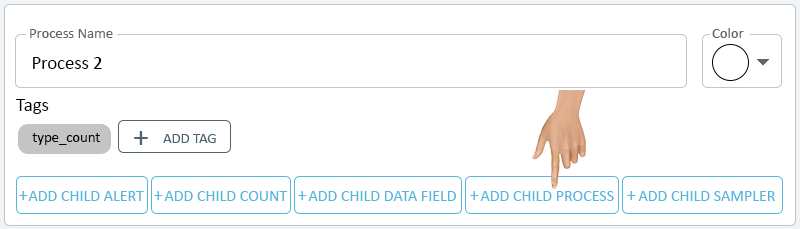
To access the Child Process setup, the user will need to select the Add Child Process button on the Process Properties.
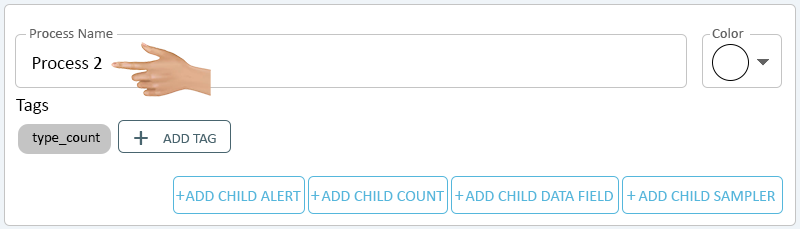
Select the Process Name field.
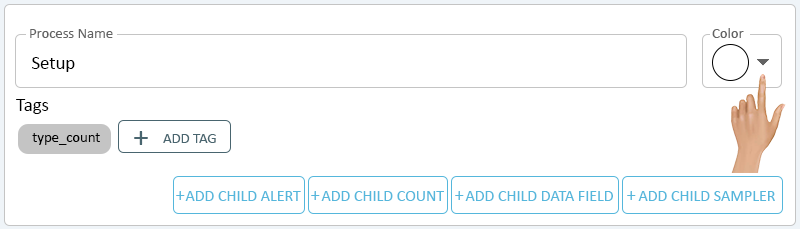
Enter a name for the Process - click on the down arrow in the Color field.
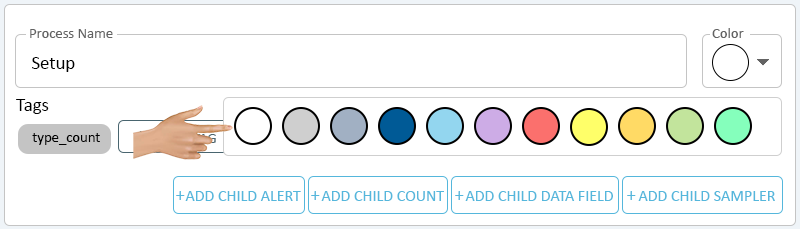
There will be a list of 11 Colors available. Select the best Color for the Process being created.
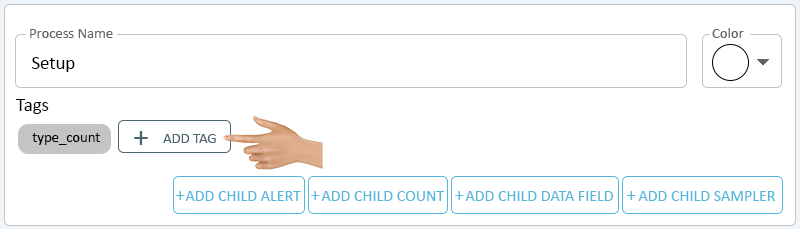
By default, all Child Processes will be tagged as "type_process". Select the Add Tag button to setup a Custom Tag for the Process being created.
Click on the Add Actions button in the Actions section to setup an Action for the Process.
- Click Here for information on setting up an Action.


|