Difference between revisions of "Red Hat - VersaVision Setup - Real Port Coordinator"
From VersaVision Support
(Created page with "<BR> <span style="box-shadow:2px 2px 15px #90A4AE; border-radius:5px; padding:20px">250px|link=Red Hat - VersaVision Setup - Real Port Coordinator</span> <div style="text-align: center;"><span style="color:#0054a6; font-size:150%;"><u>'''OVERVIEW'''</u></span></div> <BR> <div style="box-shadow:2px 2px 15px #90A4AE; border-radius:5px; padding:10px"> : :Once the Real Port Driver has been installed on the Red Hat 8 or 9 Server/Computer/VM, the...") |
|||
| Line 29: | Line 29: | ||
:[[File:Admin-Mesh-Home.png|link=Red Hat - VersaVision Setup - Real Port Coordinator]] | :[[File:Admin-Mesh-Home.png|link=Red Hat - VersaVision Setup - Real Port Coordinator]] | ||
</div> | </div> | ||
< | ---- | ||
<div class="logo_img" > | |||
{|style="background:transparent; color:black" border="0" height="100" align="right" valign="bottom" cellpadding=5px cellspacing=5px | |||
|+style="background:transparent| | |||
|-align="right" | |||
|<span style="color:#90A4AE; font-size:120%">'''Red Hat Guides'''</span> || [[File:Coor-Req-Btn.png|center|150px|Select to View Page|link=IT - Coordinator Requirements]] || [[File:Network-Install-Coor-Btn.png|Select to View Page|150px|link=Installation - Network Coordinator (RealPort)]] || [[File:RPLinux-Btn.png|150px|Select to View Page|link=Linux - Driver Install - Real Port Coordinator]] || [[File:LinuxRP-VV-Btn.png|150px|Select to View Page|link=Linux - VersaVision Setup - Real Port Coordinator]] || [[File:Coor-Status-Btn.png|150px|Select to View Page|link=Coordinator - Check Status]] | |||
|} | |||
</div> | |||
---- | |||
<div style="text-align: center;"><span style="color:#0054a6; font-size:150%;"><u>'''INSTRUCTIONS'''</u></span></div> | <div style="text-align: center;"><span style="color:#0054a6; font-size:150%;"><u>'''INSTRUCTIONS'''</u></span></div> | ||
<BR> | <BR> | ||
| Line 117: | Line 125: | ||
:Ensure the the newly added Coordinator shows in the Coordinator list. | :Ensure the the newly added Coordinator shows in the Coordinator list. | ||
:[[File:LinuxRP-VV-13.png|link=Red Hat - VersaVision Setup - Real Port Coordinator]] | :[[File:LinuxRP-VV-13.png|link=Red Hat - VersaVision Setup - Real Port Coordinator]] | ||
</div> | |||
---- | |||
<div class="logo_img" > | |||
{|style="background:transparent; color:black" border="0" height="100" align="right" valign="bottom" cellpadding=5px cellspacing=5px | |||
|+style="background:transparent| | |||
|-align="right" | |||
|<span style="color:#90A4AE; font-size:120%">'''Red Hat Guides'''</span> || [[File:Coor-Req-Btn.png|center|150px|Select to View Page|link=IT - Coordinator Requirements]] || [[File:Network-Install-Coor-Btn.png|Select to View Page|150px|link=Installation - Network Coordinator (RealPort)]] || [[File:RPLinux-Btn.png|150px|Select to View Page|link=Linux - Driver Install - Real Port Coordinator]] || [[File:LinuxRP-VV-Btn.png|150px|Select to View Page|link=Linux - VersaVision Setup - Real Port Coordinator]] || [[File:Coor-Status-Btn.png|150px|Select to View Page|link=Coordinator - Check Status]] | |||
|} | |||
</div> | </div> | ||
---- | ---- | ||
Latest revision as of 15:34, 7 May 2024

OVERVIEW
- Once the Real Port Driver has been installed on the Red Hat 8 or 9 Server/Computer/VM, the user will need to add it to the VersaVision software.
- The software will not begin to communicate with the Coordinator until it has been added to the software.
- NOTE: If this is an ADD-ON Coordinator, meaning you already have an existing Coordinator, you will need to use a different ISO Code.
- The ISO (Isolation Code) is the channel used to communicate with the Mesh Devices on the plant floor.
- Coordinators can NOT have the same ISO Code unless they are separated by 1 or more Miles in distance.
- The instructions below will explain how to add the Real Port Coordinator to the system.
REQUIREMENTS
- Computer/Server/VM must have the Real Port Driver installed. Select the "Red Hat - RP Driver Install - Step 1" button.
- User must have be assigned to a Role (VersaVision) that allows them to Add a Coordinator.
- User will need to know if there are multiple Coordinators set up in VersaVision.
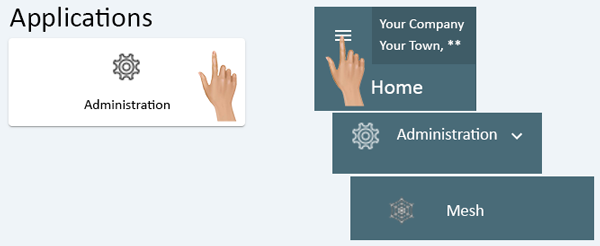
NAVIGATION
- Administration can be accessed via the Home page menu or the Administration icon. Once Administration has been selected - select Mesh from the menu.
| Red Hat Guides |
INSTRUCTIONS
- Select the "Add New" button at the top of the Coordinator list.
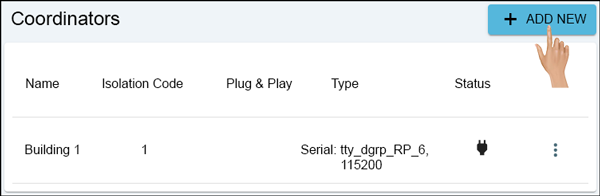
- The Add Coordinator properties window will show on the right side of the Coordinators list.
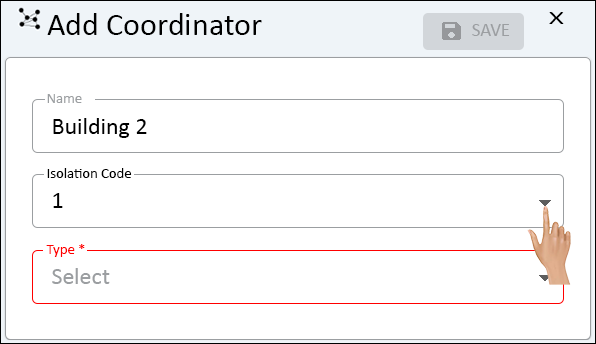
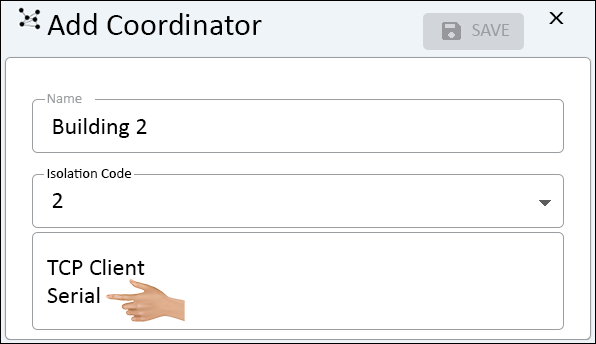
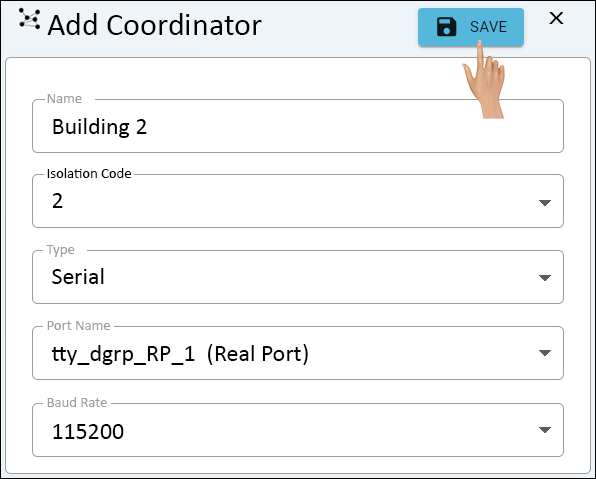
- Click in the Name field.
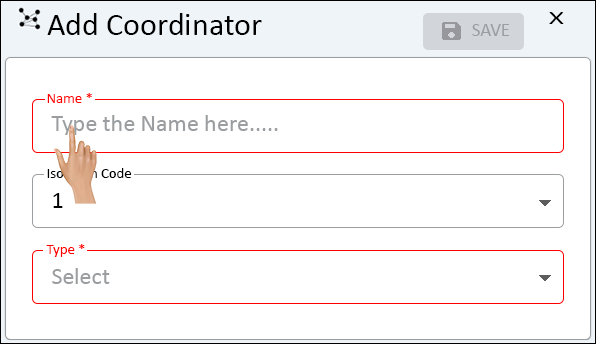
- Enter a name for the Coordinator.
- Good Practice - name the Coordinator something that will help you/others locate it.
- NOTE: If this is the only Coordinator for your system, leave the Isolation Code set to 1 (Skip the Next 2 Instructions)
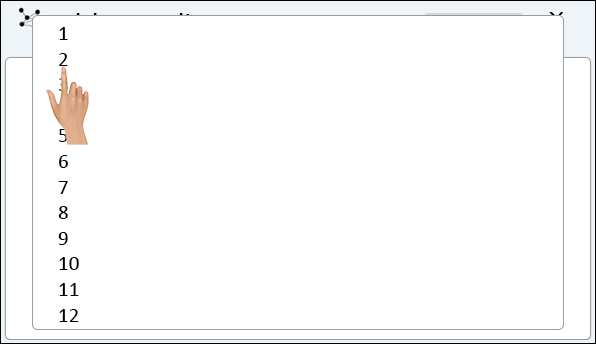
- If you have other Coordinator(s), click on the down arrow on the Isolation Code field.
- On the left side of the Add Coordinator properties, all of the installed Coordinators will show.
- Make note of all the Isolation Codes.
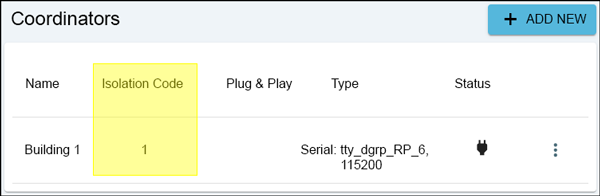
- Select an Isolation Code that is 1 greater than the highest value.
- For our example there is 1 Coordinator, the highest Isolation Code is 1.
- The code that we will be selecting is 2.
- Click on the down arrow in the Type field.
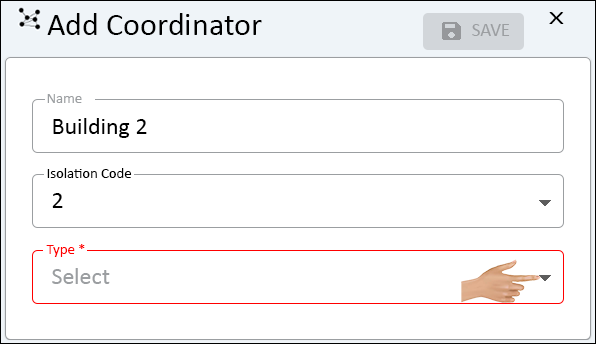
- Select Serial from the list.
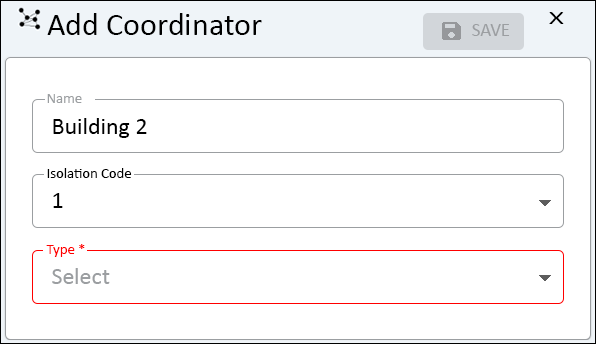
- Once Serial has been selected, the Coordinator properties options will update.
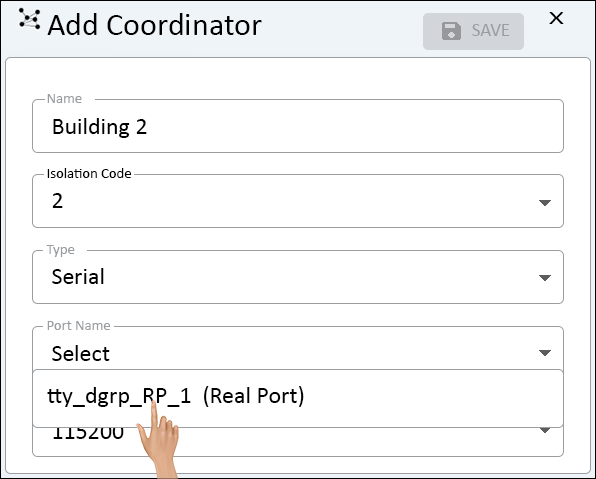
- There will now be additional fields - click on the down arrow on the Port Name field.
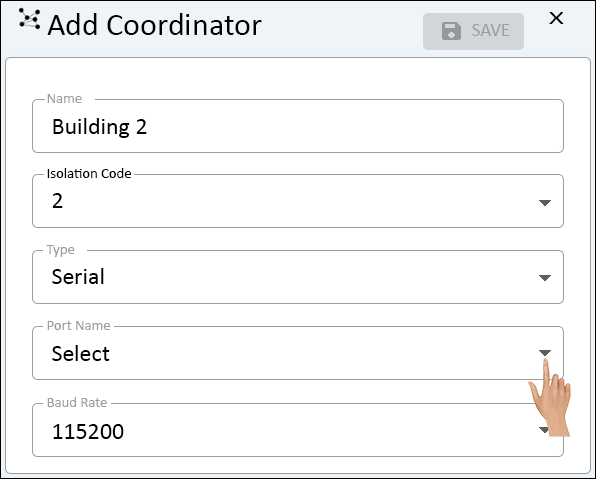
- Select the Real Port connection that was installed previously.
- This port is designated by RP.
- For our example the name is "tty_dgrp_RP_1".
- Leave the Baud Rate field set to "115200".
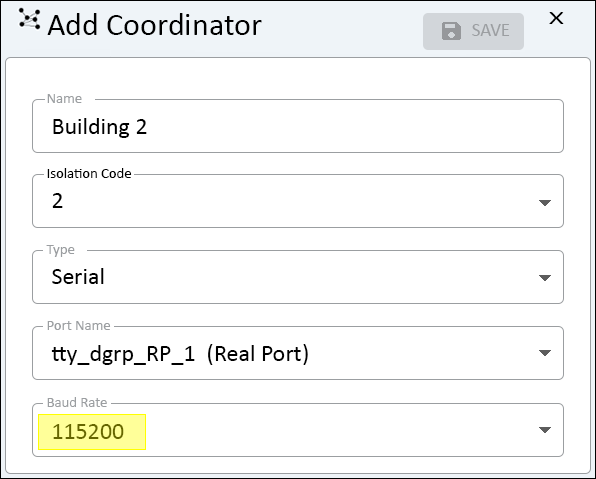
- Select the Save button at the top right side of the page.
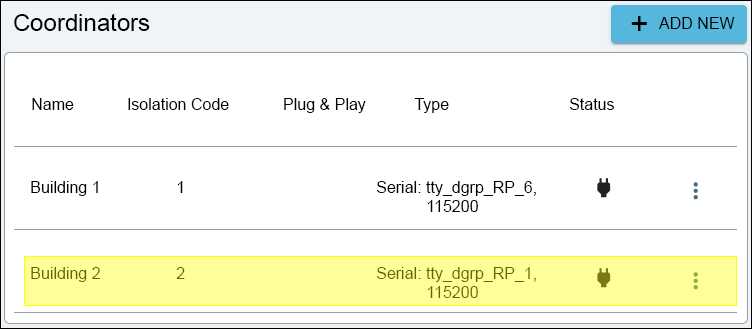
- Ensure the the newly added Coordinator shows in the Coordinator list.
| Red Hat Guides |

|