Difference between revisions of "Administration - Paging"
From VersaVision Support
| (6 intermediate revisions by 2 users not shown) | |||
| Line 1: | Line 1: | ||
<BR> | <BR> | ||
<span style="box-shadow:2px 2px 15px #90A4AE; border-radius:5px; padding:20px">[[File:Paging-Button-No.png|250px|link=Administration - Paging]]</span> | |||
<BR> | <BR> | ||
<BR> | <BR> | ||
If a VersaVision system is going to be communicating using Pagers, a Paging Transmitter would need to be installed and configured. There are 2 types of Transmitter installations, USB & Remote/Ethernet. | <div style="box-shadow:2px 2px 15px #90A4AE; border-radius:5px; padding:10px"> | ||
:<span style="text-align: left; color:#0054a6; font-size:150%;">'''O<small>VERVIEW</small>'''</span> | |||
---- | |||
This page will concentrate on setting up the Paging Transmitter once it has been installed. | : | ||
:Administration is used to access important system components. There are multiple components inside Administration, this page is focused on the Paging component. | |||
:If a VersaVision system is going to be communicating using Pagers, a Paging Transmitter would need to be installed and configured. There are 2 types of Transmitter installations, USB & Remote/Ethernet. | |||
:This page will concentrate on setting up the Paging Transmitter once it has been installed. | |||
</div> | |||
<BR> | <BR> | ||
<div style="box-shadow:2px 2px 15px #90A4AE; border-radius:5px; padding:10px"> | |||
:<span style="text-align: left; color:#0054a6; font-size:150%;">'''N<small>AVIGATION</small>'''</span> | |||
---- | ---- | ||
: | |||
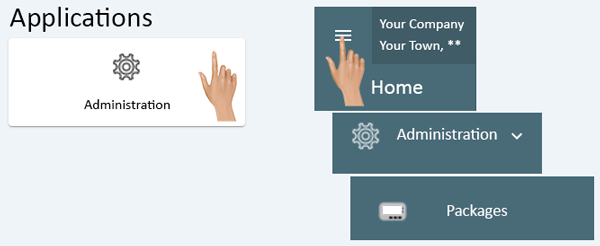
:Administration can be accessed via the Home page menu or the Administration icon. Once Administration has been selected - select Paging from the menu. | |||
: | |||
::[[File:Admin-Page-Home.png|class=glow|link=Administration - Paging]] | |||
</div> | |||
<BR> | <BR> | ||
<div style="text-align: right;"> | <div style="text-align: right;"> | ||
[[#USB|'''USB''']] [[#REMOTE|''' | <span style="border:thin solid #90A4AE; border-radius:5px; padding:5px"> | ||
[[#USB|'''USB''']] | [[#REMOTE|'''Ethernet''']] | [[#DELETE|'''Delete''']] | [[Administration - Main|'''Return to Administration''']] | |||
</span> | |||
</div> | </div> | ||
<div | <div style="text-align: right;"> | ||
<span style="color:#90A4AE;">'''Additional Information'''</span> | |||
<span style="border:thin solid #90A4AE; border-radius:5px; padding:5px"> | |||
|- | [[Add a Pager (Capcode) to a Contact|'''Add a Pager''']] | [[View a Capcode - Pager|'''View Capcode''']] | [[Program a Capcode - Pager|'''Setup Capcode''']] | [[IT - Paging Transmitter|'''Requirements''']] | ||
| | </span> | ||
[[ | |||
</div> | </div> | ||
<BR> | |||
<span id="USB"></span> | |||
<div style="box-shadow:2px 2px 15px #90A4AE; border-radius:5px; padding:10px"> | |||
:<span style="text-align: left; color:#0054a6; font-size:150%;">'''USB T<small>RANSMITTER</small>'''</span> | |||
---- | ---- | ||
: | |||
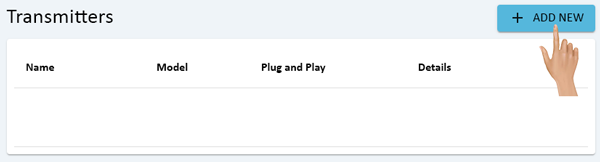
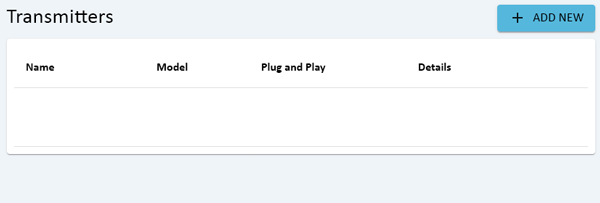
:On the Transmitters page, click on the Add New button. | |||
: | |||
On the Transmitters page, click on the Add New button. | ::[[File:Admin-Page-1.png|class=glow|link=Administration - Paging]] | ||
File:Admin-Page-1.png | |||
---- | ---- | ||
: | |||
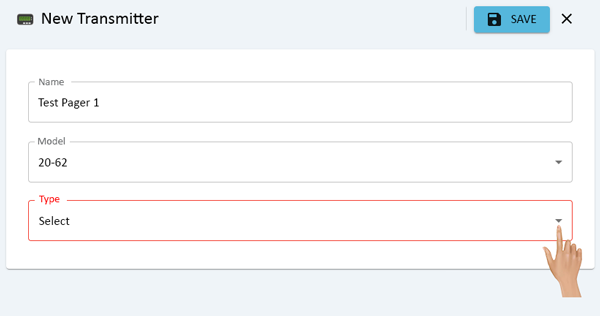
The New Transmitter properties window will load to the right of the Transmitters list. Click in the Name field and enter a name for the transmitter. | :The New Transmitter properties window will load to the right of the Transmitters list. Click in the Name field and enter a name for the transmitter. | ||
: | |||
::[[File:Admin-Page-2.png|class=glow|link=Administration - Paging]] | |||
File:Admin-Page-2.png | |||
---- | ---- | ||
: | |||
In the Model field, select 20-62 unless told to select something different by a VersaCall Technician. | :In the Model field, select 20-62 unless told to select something different by a VersaCall Technician. | ||
: | |||
::[[File:Admin-Page-3.png|class=glow|link=Administration - Paging]] | |||
File:Admin-Page-3.png | |||
---- | ---- | ||
: | |||
Click on the down arrow in the Type field, select Serial from the list. | :Click on the down arrow in the Type field, select Serial from the list. | ||
: | |||
::[[File:Admin-Page-4.png|class=glow|link=Administration - Paging]] | |||
File:Admin-Page-4.png | |||
---- | ---- | ||
: | |||
Click on the down arrow in the Port Name, select the COM Port. If the USB Paging Transmitter is not plugged into the computer, there will be no ports shown. | :Click on the down arrow in the Port Name, select the COM Port. If the USB Paging Transmitter is not plugged into the computer, there will be no ports shown. | ||
: | |||
::[[File:Admin-Page-5.png|class=glow|link=Administration - Paging]] | |||
File:Admin-Page-5.png | |||
---- | ---- | ||
: | |||
Leave the Baud Rate set to 9600. | :Leave the Baud Rate set to 9600. | ||
: | |||
::[[File:Admin-Page-6.png|class=glow|link=Administration - Paging]] | |||
File:Admin-Page-6.png | |||
---- | ---- | ||
: | |||
Once all the settings have been completed, click on the Save button. | :Once all the settings have been completed, click on the Save button. | ||
: | |||
::[[File:Admin-Page-7.png|class=glow|link=Administration - Paging]] | |||
File:Admin-Page-7.png | |||
---- | ---- | ||
: | |||
The USB Transmitter added will now show in the Transmitters list. | :The USB Transmitter added will now show in the Transmitters list. | ||
: | |||
::[[File:Admin-Page-8.png|class=glow|link=Administration - Paging]] | |||
File:Admin-Page-8.png | |||
---- | ---- | ||
: | |||
:Close the Add Transmitter properties window by clicking on the "X" next to the Save button. | |||
: | |||
::[[File:Admin-Page-9.png|class=glow|link=Administration - Paging]] | |||
</div> | |||
<BR> | <BR> | ||
<div style="text-align: right;"> | <div style="text-align: right;"> | ||
[[#USB|'''USB''']] [[#REMOTE|''' | <span style="border:thin solid #90A4AE; border-radius:5px; padding:5px"> | ||
[[#USB|'''USB''']] | [[#REMOTE|'''Ethernet''']] | [[#DELETE|'''Delete''']] | [[Administration - Main|'''Return to Administration''']] | |||
</span> | |||
</div> | </div> | ||
<div | <div style="text-align: right;"> | ||
<span style="color:#90A4AE;">'''Additional Information'''</span> | |||
<span style="border:thin solid #90A4AE; border-radius:5px; padding:5px"> | |||
|- | [[Add a Pager (Capcode) to a Contact|'''Add a Pager''']] | [[View a Capcode - Pager|'''View Capcode''']] | [[Program a Capcode - Pager|'''Setup Capcode''']] | [[IT - Paging Transmitter|'''Requirements''']] | ||
| | </span> | ||
[[ | |||
</div> | </div> | ||
<BR> | |||
<span id="REMOTE"></span> | |||
<div style="box-shadow:2px 2px 15px #90A4AE; border-radius:5px; padding:10px"> | |||
:<span style="text-align: left; color:#0054a6; font-size:150%;">'''E<small>THERNET</small> T<small>RANSMITTER</small>'''</span> | |||
---- | ---- | ||
: | |||
:On the Transmitters page, click on the Add New button. | |||
: | |||
On the Transmitters page, click on the Add New button. | ::[[File:Admin-Page-1.png|class=glow|link=Administration - Paging]] | ||
File:Admin-Page-1.png | |||
---- | ---- | ||
: | |||
The New Transmitter properties window will load to the right of the Transmitters list. Click in the Name field and enter a name for the transmitter. | :The New Transmitter properties window will load to the right of the Transmitters list. Click in the Name field and enter a name for the transmitter. | ||
: | |||
::[[File:Admin-Page-2.png|class=glow|link=Administration - Paging]] | |||
File:Admin-Page-2.png | |||
---- | ---- | ||
: | |||
In the Model field, select 20-62 unless told to select something different by a VersaCall Technician. | :In the Model field, select 20-62 unless told to select something different by a VersaCall Technician. | ||
: | |||
::[[File:Admin-Page-10.png|class=glow|link=Administration - Paging]] | |||
File:Admin-Page-10.png | |||
---- | ---- | ||
: | |||
Click on the down arrow in the Type field, select TCP Client from the list. | :Click on the down arrow in the Type field, select TCP Client from the list. | ||
: | |||
::[[File:Admin-Page-11.png|class=glow|link=Administration - Paging]] | |||
File:Admin-Page-11.png | |||
---- | ---- | ||
: | |||
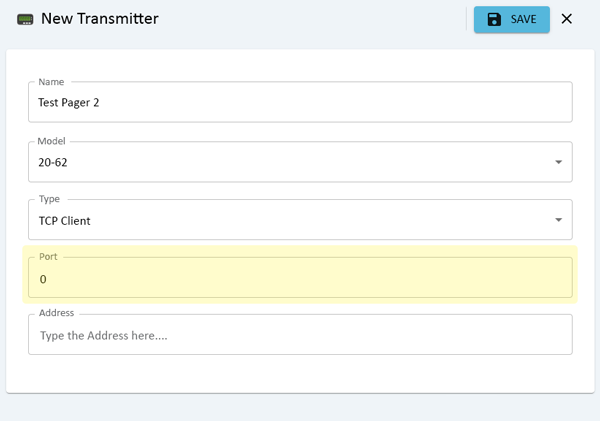
Click in the Port field, enter 4000 unless specifically told a different port by a VersaCall Technician. | :Click in the Port field, enter 4000 unless specifically told a different port by a VersaCall Technician. | ||
: | |||
::[[File:Admin-Page-12.png|class=glow|link=Administration - Paging]] | |||
File:Admin-Page-12.png | |||
---- | ---- | ||
: | |||
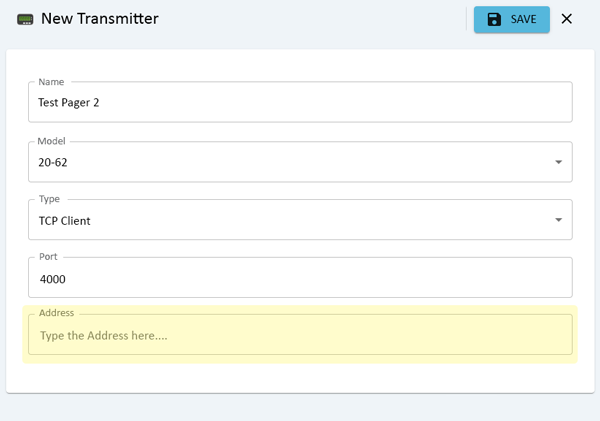
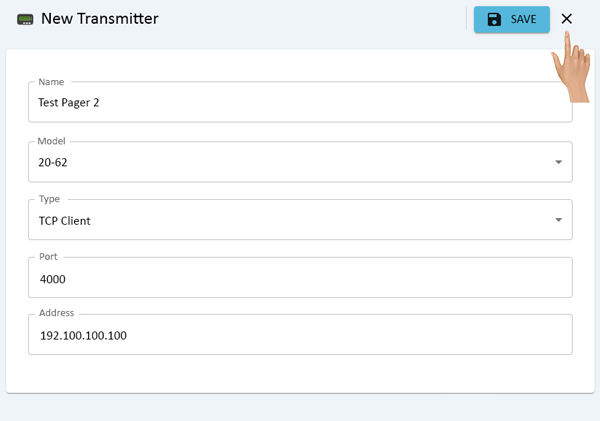
Click in the Address field, enter the IP Address of the Remote Paging Transmitter. You may need to consult your IT Department. | :Click in the Address field, enter the IP Address of the Remote Paging Transmitter. You may need to consult your IT Department. | ||
: | |||
::[[File:Admin-Page-13.png|class=glow|link=Administration - Paging]] | |||
File:Admin-Page-13.png | |||
---- | ---- | ||
: | |||
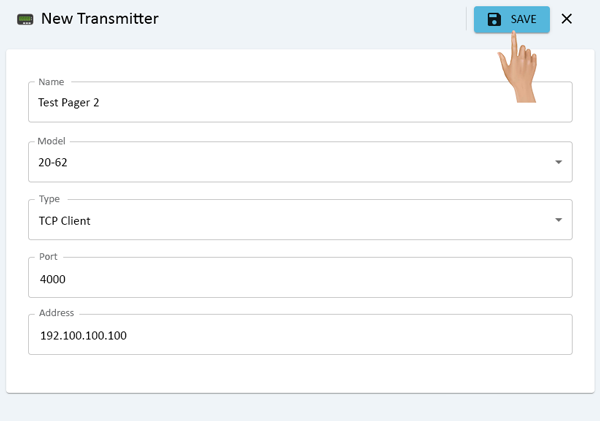
Once all the settings have been completed, click on the Save button. | :Once all the settings have been completed, click on the Save button. | ||
: | |||
::[[File:Admin-Page-14.png|class=glow|link=Administration - Paging]] | |||
File:Admin-Page-14.png | |||
---- | ---- | ||
: | |||
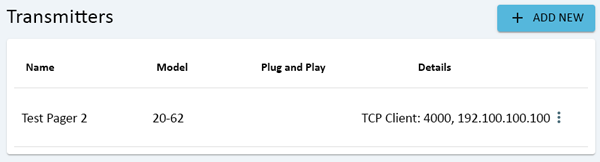
The Remote Transmitter added will now show in the Transmitters list. | :The Remote Transmitter added will now show in the Transmitters list. | ||
: | |||
::[[File:Admin-Page-15.png|class=glow|link=Administration - Paging]] | |||
File:Admin-Page-15.png | |||
---- | ---- | ||
: | |||
:Close the Add Transmitter properties window by clicking on the "X" next to the Save button. | |||
: | |||
::[[File:Admin-Page-16.png|class=glow|link=Administration - Paging]] | |||
</div> | |||
<BR> | <BR> | ||
<div style="text-align: right;"> | <div style="text-align: right;"> | ||
[[#USB|'''USB''']] [[#REMOTE|''' | <span style="border:thin solid #90A4AE; border-radius:5px; padding:5px"> | ||
[[#USB|'''USB''']] | [[#REMOTE|'''Ethernet''']] | [[#DELETE|'''Delete''']] | [[Administration - Main|'''Return to Administration''']] | |||
</span> | |||
</div> | </div> | ||
<div | <div style="text-align: right;"> | ||
<span style="color:#90A4AE;">'''Additional Information'''</span> | |||
<span style="border:thin solid #90A4AE; border-radius:5px; padding:5px"> | |||
|- | [[Add a Pager (Capcode) to a Contact|'''Add a Pager''']] | [[View a Capcode - Pager|'''View Capcode''']] | [[Program a Capcode - Pager|'''Setup Capcode''']] | [[IT - Paging Transmitter|'''Requirements''']] | ||
| | </span> | ||
[[ | |||
</div> | </div> | ||
<BR> | |||
<span id="DELETE"></span> | |||
<div style="box-shadow:2px 2px 15px #90A4AE; border-radius:5px; padding:10px"> | |||
:<span style="text-align: left; color:#0054a6; font-size:150%;">'''D<small>ELETE</small> T<small>RANSMITTER</small>'''</span> | |||
---- | ---- | ||
: | |||
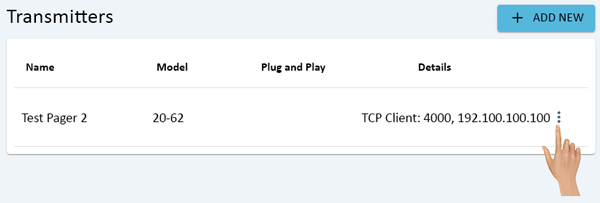
:Click on the 3 dot menu for the Paging Transmitter that needs to be removed. | |||
: | |||
Click on the 3 dot menu for the Paging Transmitter that needs to be removed. | ::[[File:Admin-Page-17.png|class=glow|link=Administration - Paging]] | ||
File:Admin-Page-17.png | |||
---- | ---- | ||
: | |||
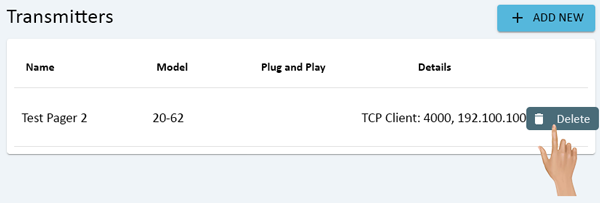
A pop-up window will load, click on the Delete option in the list. | :A pop-up window will load, click on the Delete option in the list. | ||
: | |||
::[[File:Admin-Page-18.png|class=glow|link=Administration - Paging]] | |||
File:Admin-Page-18.png | |||
---- | ---- | ||
: | |||
A Success message will appear at the bottom of the screen. | :A Success message will appear at the bottom of the screen. | ||
: | |||
::[[File:Admin-Page-19.png|class=glow|link=Administration - Paging]] | |||
File:Admin-Page-19.png | |||
---- | ---- | ||
: | |||
:The Transmitter that was selected for deletion will no longer appear on the Transmitter list. | |||
: | |||
::[[File:Admin-Page-20.png|class=glow|link=Administration - Paging]] | |||
</div> | |||
<BR> | <BR> | ||
<div style="text-align: right;"> | <div style="text-align: right;"> | ||
[[#USB|'''USB''']] [[#REMOTE|''' | <span style="border:thin solid #90A4AE; border-radius:5px; padding:5px"> | ||
[[#USB|'''USB''']] | [[#REMOTE|'''Ethernet''']] | [[#DELETE|'''Delete''']] | [[Administration - Main|'''Return to Administration''']] | |||
</span> | |||
</div> | </div> | ||
<div | <div style="text-align: right;"> | ||
<span style="color:#90A4AE;">'''Additional Information'''</span> | |||
<span style="border:thin solid #90A4AE; border-radius:5px; padding:5px"> | |||
|- | [[Add a Pager (Capcode) to a Contact|'''Add a Pager''']] | [[View a Capcode - Pager|'''View Capcode''']] | [[Program a Capcode - Pager|'''Setup Capcode''']] | [[IT - Paging Transmitter|'''Requirements''']] | ||
| | </span> | ||
[[ | |||
</div> | </div> | ||
<BR> | |||
---- | ---- | ||
{|style="background:transparent; color:black" border="0" height="200" align="center" valign="bottom" cellpadding=10px cellspacing=10px | {|style="background:transparent; color:black" border="0" height="200" align="center" valign="bottom" cellpadding=10px cellspacing=10px | ||
Latest revision as of 13:52, 5 June 2024
![]()
- OVERVIEW
- Administration is used to access important system components. There are multiple components inside Administration, this page is focused on the Paging component.
- If a VersaVision system is going to be communicating using Pagers, a Paging Transmitter would need to be installed and configured. There are 2 types of Transmitter installations, USB & Remote/Ethernet.
- This page will concentrate on setting up the Paging Transmitter once it has been installed.
- NAVIGATION
- Administration can be accessed via the Home page menu or the Administration icon. Once Administration has been selected - select Paging from the menu.
-
Additional Information Add a Pager | View Capcode | Setup Capcode | Requirements
- USB TRANSMITTER
- On the Transmitters page, click on the Add New button.
-
- The New Transmitter properties window will load to the right of the Transmitters list. Click in the Name field and enter a name for the transmitter.
-

- In the Model field, select 20-62 unless told to select something different by a VersaCall Technician.
-

- Click on the down arrow in the Type field, select Serial from the list.
-
- Click on the down arrow in the Port Name, select the COM Port. If the USB Paging Transmitter is not plugged into the computer, there will be no ports shown.
-
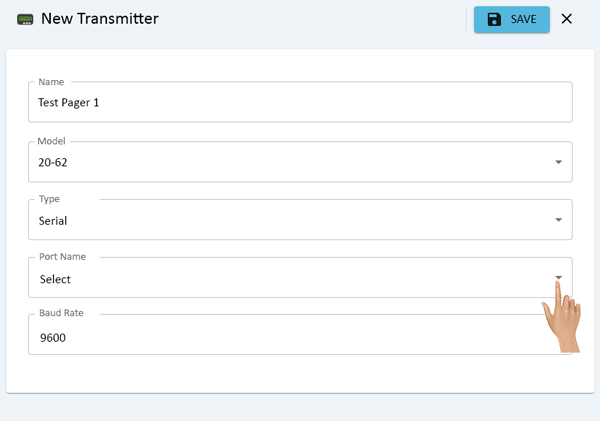
- Leave the Baud Rate set to 9600.
-
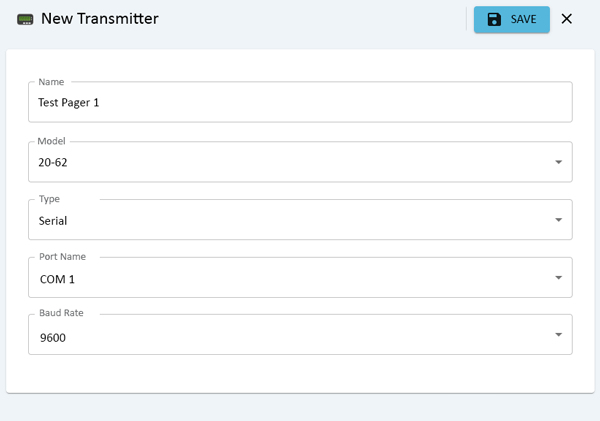
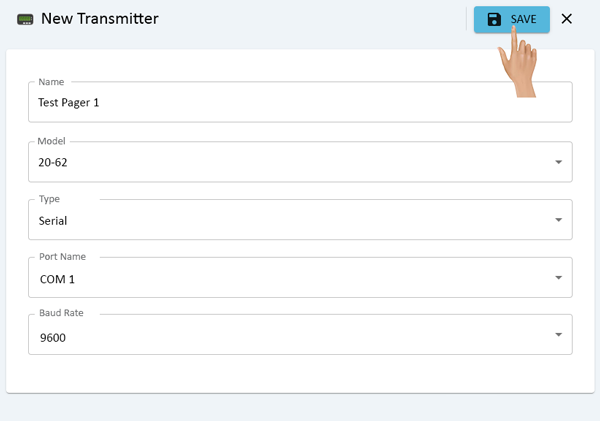
- Once all the settings have been completed, click on the Save button.
-
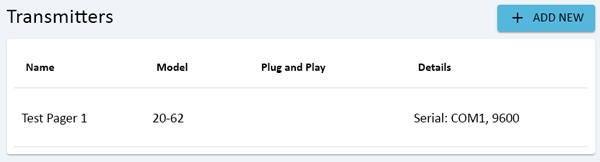
- The USB Transmitter added will now show in the Transmitters list.
-
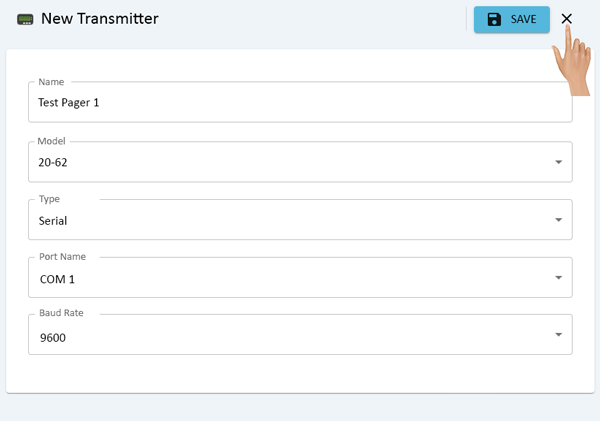
- Close the Add Transmitter properties window by clicking on the "X" next to the Save button.
-
Additional Information Add a Pager | View Capcode | Setup Capcode | Requirements
- ETHERNET TRANSMITTER
- On the Transmitters page, click on the Add New button.
-
- The New Transmitter properties window will load to the right of the Transmitters list. Click in the Name field and enter a name for the transmitter.
-
- In the Model field, select 20-62 unless told to select something different by a VersaCall Technician.
-
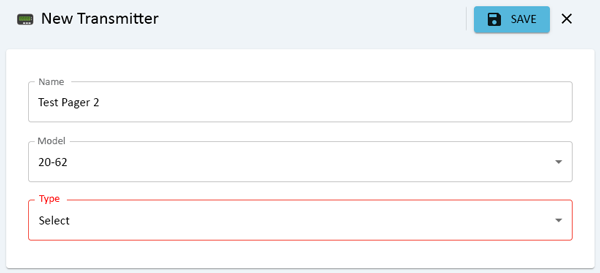
- Click on the down arrow in the Type field, select TCP Client from the list.
-

- Click in the Port field, enter 4000 unless specifically told a different port by a VersaCall Technician.
-
- Click in the Address field, enter the IP Address of the Remote Paging Transmitter. You may need to consult your IT Department.
-
- Once all the settings have been completed, click on the Save button.
-
- The Remote Transmitter added will now show in the Transmitters list.
-
- Close the Add Transmitter properties window by clicking on the "X" next to the Save button.
-
Additional Information Add a Pager | View Capcode | Setup Capcode | Requirements
- DELETE TRANSMITTER
- Click on the 3 dot menu for the Paging Transmitter that needs to be removed.
-
- A pop-up window will load, click on the Delete option in the list.
-
- A Success message will appear at the bottom of the screen.
-
- The Transmitter that was selected for deletion will no longer appear on the Transmitter list.
-
Additional Information Add a Pager | View Capcode | Setup Capcode | Requirements

|