Difference between revisions of "Administration - Mesh"
From VersaVision Support
| (One intermediate revision by the same user not shown) | |||
| Line 34: | Line 34: | ||
<BR> | <BR> | ||
<div style="box-shadow:2px 2px 15px #90A4AE; border-radius:5px; padding:10px"> | <div style="box-shadow:2px 2px 15px #90A4AE; border-radius:5px; padding:10px"> | ||
<BR> | <BR> | ||
<div style=" | :<div style="text-align: center;"><span style="color:#0054a6; font-size:150%;">'''Installation on New Computer - Computer Provided by VersaCall'''</span></div> | ||
: | :<div style="text-align: center;"><span style="color:#0054a6; font-size:120%;">Select a Guide Below for Detailed Instructions</span></div> | ||
:The | <div class="zoom_img" > | ||
{|style="background: transparent; color:black" border="0" height="400" align="center" valign="bottom" cellpadding=10px cellspacing=10px | |||
</div> | |+style="background:transparent"| | ||
|-align="center" | |||
|- | |||
|+style="background:transparent"| | |||
|[[File:New-USB-Step4.png|200px|Click for Additional Information|link=IT - Coordinator Requirements]] || [[File:New-USB-Step1.png|200px|Click for The Guide|link=Installation - USB Coordinator]] || [[File:New-USB-Step2.png|200px|Click for The Guide|link=New System - USB Coordinator - VersaVision Setup]] || [[File:New-USB-Step3.png|200px|Click for The Guide|link=Coordinator - Check Status]] | |||
|} | |||
---- | |||
:<div style="text-align: center;"><span style="color:#0054a6; font-size:150%;">'''Add-On Coordinator Installation - Computer Provided by VersaCall'''</span></div> | |||
:<div style="text-align: center;"><span style="color:#0054a6; font-size:120%;">Select a Guide Below for Detailed Instructions</span></div> | |||
<BR> | <BR> | ||
<div style=" | <div class="zoom_img" > | ||
: | {|style="background: transparent; color:black" border="0" height="400" align="center" valign="bottom" cellpadding=10px cellspacing=10px | ||
:Click | |+style="background:transparent"| | ||
:[[File: | |-align="center" | ||
|- | |||
|+style="background:transparent"| | |||
|[[File:Add-USB-Step4.PNG|200px|Click for Additional Information|link=IT - Coordinator Requirements]] || [[File:Add-USB-Step1.PNG|200px|Click for The Guide|link=Installation - USB Coordinator]] || [[File:Add-USB-Step2.PNG|200px|Click for The Guide|link=Existing System - USB Coordinator - Add On]] || [[File:Add-USB-Step3.PNG|200px|Click for The Guide|link=Coordinator - Check Status]] | |||
|} | |||
<BR> | <BR> | ||
</div> | </div> | ||
</div> | </div> | ||
</div> | </div> | ||
---- | ---- | ||
| Line 118: | Line 75: | ||
|- | |- | ||
|+style="background:transparent"| | |+style="background:transparent"| | ||
|[[File: | |[[File:LinuxRP-Step-5.png|200px|Click for Additional Information|link=IT - Coordinator Requirements]] || [[File:LinuxRP-Step-1.png|200px|Click for The Guide|link=Installation - Network Coordinator (RealPort)]] || [[File:LinuxRP-Step-2.png|200px|Click for The Guide|link=Linux - Driver Install - Real Port Coordinator]] || [[File:LinuxRP-Step-3.png|200px|Click for The Guide|link=Linux - VersaVision Setup - Real Port Coordinator]] || [[File:LinuxRP-Step-4.png|200px|Click for The Guide|link=Coordinator - Check Status]] | ||
|} | |} | ||
---- | ---- | ||
| Line 130: | Line 87: | ||
|- | |- | ||
|+style="background:transparent"| | |+style="background:transparent"| | ||
|[[File: | |[[File:RH-RP-Step5.png|200px|Click for Additional Information|link=IT - Coordinator Requirements]] || [[File:RH-RP-Step1.png|200px|Click for The Guide|link=Installation - Network Coordinator (RealPort)]] || [[File:RH-RP-Step2.png|200px|Click for The Guide|link=Red Hat - Driver Install - Real Port Coordinator]] || [[File:RH-RP-Step3.png|200px|Click for The Guide|link=Red Hat - VersaVision Setup - Real Port Coordinator]] || [[File:RH-RP-Step4.png|200px|Click for The Guide|link=Coordinator - Check Status]] | ||
|} | |} | ||
<BR> | <BR> | ||
Revision as of 12:49, 6 May 2024
![]()
OVERVIEW
- Administration is used to access important system components. There are multiple components inside Administration, this page is focused on the Mesh component.
- When a system is using VersaCall hardware such as IO Modules, Touch Screens or Wireless Lights, the wireless mesh technology it being used. A Coordinator is required to be connected to the Server. This connection can be through USB or Ethernet.
- This guide does not cover the hardware installation, only the setup after a Coordinator has been connected to the computer vis USB or Ethernet.
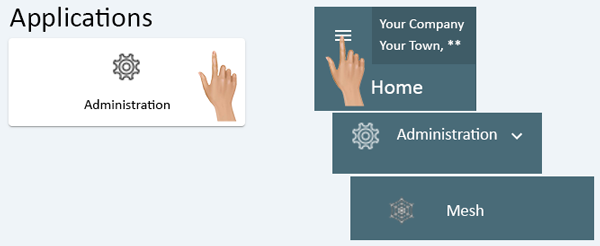
NAVIGATION
- Administration can be accessed via the Home page menu or the Administration icon. Once Administration has been selected - select Mesh from the menu.
|
|
ADD A USB COORDINATOR
- Installation on New Computer - Computer Provided by VersaCall
- Select a Guide Below for Detailed Instructions
 |
 |
 |
|
- Add-On Coordinator Installation - Computer Provided by VersaCall
- Select a Guide Below for Detailed Instructions
 |
 |
 |

|
ADD A REMOTE/ETHERNET COORDINATOR
- Installation on Linux (Ubuntu) OS
- Select a Guide Below for Detailed Instructions
 |
 |
 |
 |

|
- Installation on Red Hat (8 or 9) OS
- Select a Guide Below for Detailed Instructions
 |
 |
 |
 |

|
|
|
REMOVE/DELETE A COORDINATOR
- Click on the 3 dot menu for the Coordinator that needs to be removed.
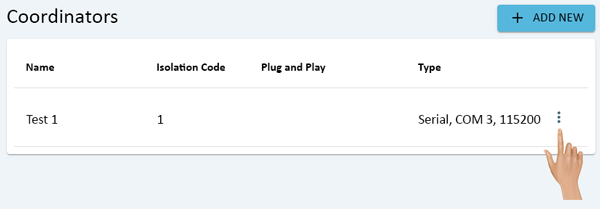
- A pop-up window will load, click on the Delete option in the list.
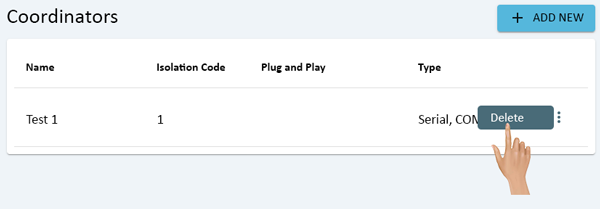
- A warning message will appear on the screen. Select Delete to remove the Coordinator or select Cancel to keep the Coordinator.

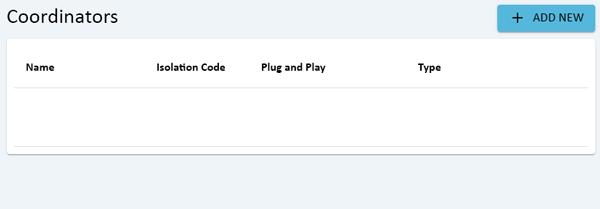
- If Delete was selected, a Success message will appear at the bottom of the screen.

- The Coordinator that was selected for deletion will no longer appear on the Coordinator list.
|
|

|